S’mores Marshmallow Crispy Treats

Happy fall, y’all! I know it hasn’t really felt like fall, at least here in central Illinois, but technically it is and that means bonfires and making s’mores and drinking hot cocoa! Sometimes having a bonfire isn’t feasible but thankfully there are about as many variations as there are leaves to rake.  Take these S’mores Marshmallow Crispy Treats, for example.  They have all the ingredients of a traditional s’more without the requirement of fire.  This recipe makes a lot of treats so it’s perfect for taking to festive fall gatherings.

S'mores Marshmallow Crispy Treats

S’mores Marshmallow Crispy Treats
slightly adapted from My Baking Addiction

Ingredients
6 tablespoons unsalted butter
2 10.5-ounce packages mini marshmallows, divided use
2 teaspoons pure vanilla extract
7 cups crisped rice cereal
9 full graham cracker sheets, chopped into small pieces
1 cup milk chocolate chips
optional: about 1.5 – 2 cups of mini marshmallows and about 1/2-cup of milk chocolate chips (sorry, I didn’t measure, just sprinkled them on)

What To Do
Spray with non-stick spray and/or spread some softened butter along the sides and bottom of a 9″ x 13″ baking pan and set aside.

In a large pan, melt butter over low heat.

Set aside 2 cups marshmallows.  Add the rest of the marshmallows to the pan and stir until completely melted.

Remove pan from heat and stir in the vanilla.  Gradually add crisped rice cereal and graham cracker crumbs; stirring until well coated.  Fold in the reserved 2 cups of marshmallows and chocolate chips until thoroughly incorporated.

Using a buttered spatula, or clean hands, firmly press the mixture into the prepared pan.

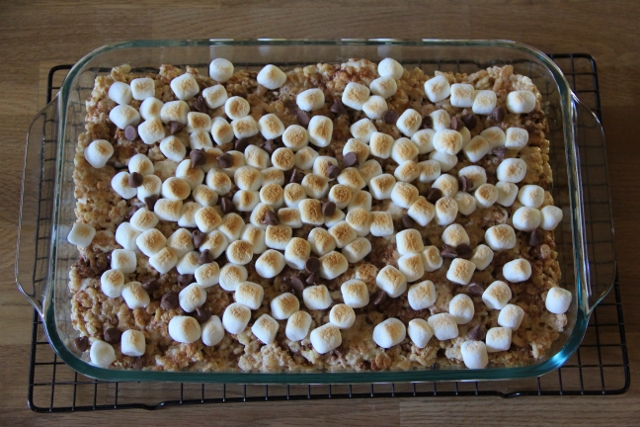
If desired, top with additional mini marshmallows and place on the center rack of the oven.  Turn the broiler on low and broil for about 5 minutes, watching carefully, until the marshmallows have browned to your liking.  Remove from oven and sprinkle additional chocolate chips on top.

Cool completely before cutting and serving.

My Comments
The bags of mini marshmallows I bought were 10 oz each.

9 full sheets of graham crackers is one full sleeve of crackers that come 3 sleeves in a box – I think this is pretty standard.

I both sprayed my pan and spread butter in it and it was super easy to get the bars out.

I think next time I will also sprinkle some chopped graham crackers on top.  I couldn’t really taste them in the bars and I think extra on top would look nice and give an extra graham cracker flavor boost.

Some Photos Along the Way
Butter and mini marshmallows melting together
S'mores Marshmallow Rice Crispy Treats

Stirring in cereal and graham crackers
S'mores Marshmallow Crispy Treats

Adding mini marshmallows and chocolate chips
S'mores Marshmallow Crispy Treats

The mixture pressed into the pan
S'mores Marshmallow Crispy Treats

Extra mini marshmallows on top
S'mores Marshmallow Crispy Treats

Turning the broiler on
S'mores Marshmallow Crispy Treats

Extra chocolate chips sprinkled on top
S'mores Marshmallow Crispy Treats


All I can say is YUMMY! I recently took these to a family function (where there was no bonfire) and they were a big hit.  So if you can’t have a real s’more, try this twist and I think you’ll be happy!

Mini Pumpkin Cheesecakes

Oh, everything is so cute when it’s miniature! When I saw these Mini Pumpkin Cheesecakes, I knew I just had to try them.  I love cheesecake and I love pumpkin, so why not combine the two?

And really, can I just take a minute to say how awesome pumpkin, and squash in general,  is? I mean, you can use it in so many ways:  breakfast, lunch, dinner, snacks and desserts! Sweet and savory!

These cheesecakes are obviously as sweet as can be.  They took a little work, but they are worth the effort.  Plus, you can make them ahead of time, which is great if you are planning a big meal.  Getting as much done ahead of time means less stress!

Mini Pumpkin Cheesecakes

Mini Pumpkin Cheesecakes
from My Baking Addiction

Ingredients
Crust
6 tablespoons granulated sugar
6 tablespoons all-purpose flour
6 tablespoons cocoa powder
pinch of salt
4 1/2 tablespoons unsalted butter, softened

Filling
1 8-ounce package cream cheese, room temperature
1/4 cup brown sugar
1/4 cup granulated sugar
1 tablespoon molasses
1 cup canned pumpkin puree (I used homemade)
1 teaspoon vanilla extract
pinch of salt
2 1/2 teaspoons pumpkin pie spice (I used homemade)
3 large eggs

Topping
1/2 cup whipping cream or heavy cream
1 cup semi-sweet chocolate chips

What To Do
Preheat the oven to 350°F and line a pan with 12 muffin liners. Note that this crust recipe does not work in regular pie pans and only as mini cheesecakes.

Crust
In a large mixing bowl, mix together the sugar, flour, cocoa powder, and salt. Beat in the butter at low speed until thoroughly combined and a dough forms. If you have trouble incorporating it, use your hands. It’ll be sticky.

Divide the dough between the muffin liners. Press the dough down with the bottom of a shot glass.  Bake for 11-13 minutes or until the surface of the crust no longer appears wet.

After baking, the crust will still be soft but will firm slightly as it cools. Let cool for 10 minutes while you prepare the cheesecake.

Cheesecake Filling
Turn the oven down to to 325°F.

Beat the cream cheese at medium speed until light and fluffy.

Add the brown sugar, granulated sugar, molasses, pumpkin puree, vanilla extract, salt and pumpkin pie spice and beat on low until well combined.

Add the eggs one at a time, beating on low after every addition until thoroughly incorporated. Do not over mix!

Fill each muffin liner to the top with cheesecake batter and bake for 20 minutes or until the middles of the cheesecakes are set and don’t jiggle when the pan is tapped.

Remove from the oven and let the cheesecakes cool in the pan.

Once completely cool (about 1 hour), remove the cheesecakes from the pan and refrigerate for at least 2 hours or until ready to serve. The wrappers come off neatly before and after refrigeration.

Refrigerate the cheesecakes in an airtight container for up to 3 days.

Topping
In a small saucepan over medium-low heat, warm the cream just until hot, steamy and on the verge of simmering. Remove from the heat.

Pour this over the chocolate chips and stir until all the chocolate chips are completely melted.

Let cool for about 20-30 minutes or until room temperature before pouring over the chilled cheesecakes.

My Comments
Crust:  It took mine several minutes in the mixer to become dough and I did have to stop a couple of times to scrape around the bottom of the bowl.  Don’t panic if yours looks like crumbs for a while.  I also used a small cookie scoop to distribute the dough and then used a wooden tamper to pack it in (see photo below).  I think next time, I will try using a regular graham cracker crust.

Cheesecake Filling:  I used a larger cookie scoop to distribute the filling.  This reduces spills and batter going where it doesn’t belong.  I did have a little leftover batter, which I just put into a small ramekin and baked it without a crust.

Topping:  I love ganache but I actually didn’t have enough cream to make enough (oops!), so I decided to follow the directions on the bag of chocolate chips to melt chocolate for dipping.  I made half the recipe, which is 1/2 a cup of chips melted with 1/2 a tablespoon of shortening.  I did this on the stove, which always works better for me than the microwave.  Then I topped it with mini chocolate chips…because they’re so darn cute!

Some Photos Along the Way
Crust ingredients before adding butter
Mini Pumpkin Cheesecakes

The crust dough after adding butter
Mini Pumpkin Cheesecakes

Dividing crust dough between muffin liners
Mini Pumpkin Cheesecakes

The baked crust
Mini Pumpkin Cheesecakes

Cheesecake filling ingredients before adding eggs
Mini Pumpkin Cheesecakes

Cheesecake filling with an egg
Mini Pumpkin Cheesecakes

The baked mini cheesecakes, cooling
Mini Pumpkin Cheesecakes

Mini cheesecakes with topping
Mini Pumpkin Cheesecakes

All twelve mini pumpkin cheesecakes
Mini Pumpkin Cheesecakes


Whew! Really, these aren’t hard, just a bit time consuming.  And wow, once you take a bite, you’ll forget all about all your troubles! Well, that might be a slight exaggeration, but these are quite tasty…and maybe for a few minutes you’ll bask in the pumpkin-y cheesecake-y goodness of these adorable little treats.

Tortellini with Pumpkin Alfredo Sauce

So I ended up buying four pie pumpkins this year! Come on, they were 50 cents each! I’m surprised I didn’t get more, but maybe I held back because I had other squash filling my wagon too.  Oh how I love going to the pumpkin patch and getting all kinds of fall favorites!

Since my trip to the patch, I’ve been thinking about how I’m going to use all that yummy squash.  The other night, I had the opportunity to look through some old magazines and found this Tortellini with Pumpkin Alfredo Sauce recipe.  I was immediately intrigued and went out to get the ingredients I didn’t have.

This tortellini dish has a really nice flavor – the pumpkin is mild, but if you use canned pumpkin, it might be stronger.  Both Matt and I really enjoyed it and I think the leftovers the next day were even better!

Tortellini with Pumpkin Alfredo Sauce

Tortellini with Pumpkin Alfredo Sauce
from the October 2012 issue of Food Network Magazine

Ingredients
kosher salt
2 9-oz packages of cheese tortellini
1 T unsalted butter
1 small shallot, finely chopped
1/2 c canned pure pumpkin
pinch of freshly grated nutmeg
1 1/4 c heavy cream
1/4 c grated parmesan cheese, plus more for topping
freshly ground pepper
chopped fresh parsley, for topping (optional)

What To Do
Bring a large pot of salted water to a boil.  Add the tortellini and cook as the label directs.  Reserve 1/2 c cooking water, then drain the pasta.

Meanwhile, heat the butter in a skillet over medium-high heat.  Add the shallot and cook, stirring, until slightly soft, about 2 minutes.  Add the pumpkin and nutmeg and cook, stirring, 1 minute.  Stir in the cream and bring to a low boil.

Reduce the heat to medium-low; simmer, stirring, until slightly thickened, about 5 minutes.  Stir in the cheese and cook until thick, about 1 more minute.  Season with salt and pepper.

Add the tortellini to the skillet and toss with the sauce, adding some of the reserved cooking water to loosen, if needed.

Serve and top with more cheese and parsley, if desired.

My Comments
I made a few substitutions:  onion instead of shallot, homemade pumpkin instead of canned, dried nutmeg instead of fresh, fresh thyme (it’s still going strong in my garden) instead of parsley.

Some Photos Along the Way
Cooking the tortellini – mine only took 3 minutes
Tortellini with Pumpkin Alfredo Sauce

Cooking the onion in butter
Tortellini with Pumpkin Alfredo Sauce

Butter and onion plus pumpkin and nutmeg
Tortellini with Pumpkin Alfredo Sauce

Now with the heavy cream added
Tortellini with Pumpkin Alfredo Sauce

The sauce has thickened and the cheese has been added
Tortellini with Pumpkin Alfredo Sauce

I added the sauce to the tortellini because my skillet wasn’t big enough to add the tortellini to the sauce.
Tortellini with Pumpkin Alfredo Sauce


Pumpkin pasta is a great way to celebrate some fall flavors.  Pumpkin is pretty good for you too, so bonus! This recipe was fairly quick to put together and I will definitely be making it again.   I hope you can try it out soon and I hope you all are enjoying this fall season.  Have a great weekend!

Black Bean and Sweet Potato Chili

Hello out there! I know it’s been a while since I’ve posted a recipe and I do apologize! I’ve just been busy busy busy and well, this happens every fall.  There’s just so much to do outside and I’ve been trying to get it all done before it gets cold and stays cold.

Something fun: I’m going to get to expand my garden space next year!!! Matt & I have been busy preparing new beds and I’m over-the-moon excited!

BUT, we do have to eat in the meantime, right? Well, here’s a chili recipe that’s nutritious and delicious and doesn’t really take that much time.  I made it today in the midst of working in the yard.  This recipe is a great way to celebrate sweet potatoes and also use up any lingering tomatoes.  It’s full of flavor and is very comforting, especially after a long laborious day.  Don’t let the long list of ingredients scare you off, it’s not that bad, really!

Black Bean and Sweet Potato Chili

Black Bean and Sweet Potato Chili
I have no idea where I got this recipe from…it’s a copy from a cookbook, it’s on page 208 but I have no idea what cookbook it’s from!

Ingredients
2 T extra-virgin olive oil
1 medium red onion, chopped
1 red pepper, chopped
4 cloves garlic, minced
2 t sea salt
1 large sweet potato, cut into 1/2″ cubes
zest and juice of 1 lime
1 can (28 oz) diced tomatoes (or use straight from the garden)
4 cans (15 oz each) black beans, rinsed and drained
1 jalapeño chili pepper, seeded and chopped
1 T cumin
1 T chili powder
1 t cocoa powder
1 lime, cut into wedges
1 c chopped cilantro leaves, washed and dried

What To Do
1 – Warm the oil in a large pan over medium heat and add the onion, red pepper, garlic and salt.  Saute until soft, about 4 minutes.

2 – Add the sweet potato and lime zest, cook 10-15 minutes more, stirring occasionally.

3 – Add the tomatoes, black beans, jalapeño, lime juice, cumin, chili powder and cocoa, bring to a simmer, cover, and cook for 10 minutes.

4 – Serve over brown rice with lime wedges and cilantro.

My Comments
If you don’t want to use canned black beans, use 6 cups of freshly cooked beans.

I left the jalapeño out.

Don’t let it go too long between stirs – mine got a little stuck on the bottom of the pan, but thankfully it came off when I added the tomatoes.  Just don’t let anything burn! 🙂

This should freeze well, I’m going to put a couple individual portions in the freezer to enjoy later.

Some Photos Along the Way
Some ingredients
Black Bean and Sweet Potato Chili

The black beans rinsed and draining
Black Bean and Sweet Potato Chili

Step 1
Black Bean and Sweet Potato Chili

Step 2
Black Bean and Sweet Potato Chili

The ingredients of steps 1 and 2 mixed together
Black Bean and Sweet Potato Chili

Step 3
Black Bean and Sweet Potato Chili


I hope you all are enjoying this fall season.  There are so many wonderful foods to enjoy, like sweet potatoes! Have a great rest of your week!

Baked Apple Chips

These are nacho typical chips.  Haha, get it?

Anyway, apples are good for you and these apple chips are a great way to get in your apple a day, as prescribed by the doctor.  And apples are so in season right now.  Apples are the new peach.

Okay, enough.  Better get your ovens ready, before it’s too late.


Apple Chips


Baked Apple Chips
inspired by Fifteen Spatulas and Sally’s Baking Addiction

Ingredients
2 golden delicious apples
1/8 tsp ground cinnamon
1 tsp sugar

What To Do
Preheat the oven to 225ºF.

Stir together the cinnamon and sugar to combine. Set aside.

Decide whether or not to core your apples, then slice them thinly with a mandolin slicer. Line two sheet pans with parchment paper, and place the apple slices side by side on the parchment, in a single layer. Make sure not to overlap the apple slices or place them on top of each other, otherwise they won’t crisp up. Sprinkle the apple slices with the cinnamon sugar, and note that if you sprinkle from high above, the cinnamon sugar will disperse more evenly.

Bake the apple slices for 1 hour, then remove them from the oven and flip them over. The apples will be floppy, but they will crisp up later. Return the apple slices to the oven for another hour, then turn the oven off. Let the apple chips cool completely in the oven, this is when they will crisp up.

My Comments
I have no idea what kind of apples I have used so far.  I have a friend with a tree in her yard and used those.  They are red with some green in them too.  I think you should just use your favorite apple or experiment a little to see what you like best.

I did not measure the cinnamon and sugar.  I just mixed some together.  Start with sugar and then add a little cinnamon to your liking.

These are really tasty! Crisp and delicious!

Some Photos Along the Way
Slicing an apple with my friend’s mandolinApple Chips
Apple slices on my silicone baking mat, sprinkled with cinnamon sugarApple Chips
After the first hourApple Chips
Flipped overApple Chips
After the second hour and cooled in the ovenApple Chips


These do take some time to make.  Perhaps if you have a food dehydrator it would go faster.  But to me, it’s totally worth the time.  I was so surprised at how good these are! These are so great to munch on and I really hope you give them a try!

Have a great week!