Freezing Citrus Peel

Howdy! I just have a quick tip for you today.  It’s come in handy for me and I’m hoping it comes in handy for you too.

Do you ever have a need for some grated lemon or orange peel but don’t have one handy? Do you ever need juice from a lemon or orange but not the peel?

Well, quite some time ago, I read about how you can freeze peels and then zest them later.  I tried it out and it works very well.  So, now I freeze any lemon or orange peels I may have leftover from juicing either one or eating oranges.  (That’s right, I don’t just eat lemons!)  I’m sure it works for limes too, but I just don’t use limes that much so I don’t have a stash of lime peels in my freezer.

Just pop them in the freezer and pull ’em out when you need some zest.  Let them thaw first, of course, then zest away!


Freezing Citrus Peel


I ♥ not wasting citrus peels!

Gourd Candles

Oh, I’m so excited!!! Making gourd candles is one of my favorite crafts of all time.  And now that it is Fall, I get to make them again! These gourd candles are super fun to create.  They make adorable decorations for your dinner table or anywhere in your house.  Thanksgiving is coming up soon and these would look so cute on your table!


Gourd Candles


You Will Need
Miniature gourds
A knife, hacksaw and/or cleaver
A spoon (a grapefruit spoon is helpful)
granulated wax/wax beads (found at the craft store)
pre-waxed wicks (also at the craft store)
tea lights
matches/lighter

What To Do
Buy a variety of mini gourds from the farmer’s market or the store.  Or ask around – last year I got some for free when a lady in the neighborhood didn’t want hers anymore! Here’s what I got this year from a nearby farm:

Mini Gourds
Carefully cut the top off each gourd with a knife/hacksaw/cleaver and scoop out all the seeds/pulp with a spoon.  If your gourd has trouble standing up, you might want to trim the bottom off to make it level so it won’t fall over.  Or, if you have one with a long neck, just make the hole on its side and leave it sitting sideways.

Step 1 Collage
Place a wick into the center of the hole, trim if necessary and fill with granulated wax/beaded wax.  Use a tea light if the hole is shallow and small.

Step 2 Collage
Arrange your candles on a tray or large plate and add decorations to create a beautiful fall centerpiece.  You could add fall leaves, flowers, pinecones…whatever your heart desires.  Maybe even some herbs like rosemary or thyme or sage or just leave it plain – the candles alone are so festive and fun!  Light them and enjoy!

Gourd Candles


Remember – Safety First!!! Be careful when cutting the gourds – some are harder to cut than others.  And of course, don’t play with matches and don’t forget to blow the candles out when you’re not enjoying them. 🙂

Garden Planning 2014

Hello! I hope you are well.  I’ve been under the weather the past couple days and it makes me appreciate being healthy!

Speaking of weather…my garden is still completely covered with snow, but it is time to start some planning and preparation for garden season!! Woo Hoo! That makes my sore throat sing.  I don’t have much to add to last year’s post about garden planning, but is it time to get those seeds started if you are going the seed route, which I hope you are.

Garden Planning

If you’ve never grown anything by seed before, I encourage you to at least get one packet of seeds to try out.  They’re cheap and it’s so fun and rewarding to grow something from seed.

I like to try something new each year but haven’t yet decided what that’s going to be for this year.  There are so many choices! I normally only like to grow food, but I think I will plant some flowers this year.  I have a longing for cutting pretty little flowers and putting them in jars around the house.

To help you choose, think about what you like to eat and think about what you missed eating throughout winter.  Perhaps you can grow enough over the summer to put some up to enjoy during winter.  What worked well last year? Or what didn’t work well last year? My sweet bell peppers didn’t do a darn thing last year…I may just get those at the farmer’s market this year and use that space for something else.

The most important thing to remember is to have fun! Gardening does take some work, but it’s mostly just pure fun and learning and growing.  It’s a great way to spend time with family and friends.  It’s a great way to get some exercise out in the fresh air.

So while it’s still snowy/cold out, go ahead and start planning your garden and then when it warms up you can go enjoy the great outdoors.

Over-the-Door Spice Rack

Hello, everyone! I hope you all are well and that you had wonderful Christmas and New Year celebrations! Matt and I hosted family throughout the week of Christmas and had a great time.  One time when I opened my pantry to get something, one of my sisters saw how I turned an Over-the-Door Shoe Rack that was a wedding gift into this Over-the-Door Spice Rack and liked it so I thought I’d share it with you too!


Spice Rack


I love it because it saves space in the pantry and I don’t have to dig around in the pantry.  Everything is right there on the door in a neat orderly fashion…and yes…in alphabetical order too! I know I’m a little OCD (someone I know likes to remind me every now and then) but seriously, I like to think this genius idea cuts down on wasted time looking for that one spice I need that’s bound to be in the back.  It’s also easy to see what we have and don’t have and when we need to replace something.  And really, I don’t have that many shoes.

It does make me so very happy to turn something I don’t need into something that makes my life easier.  Maybe you have a creative way to organize your spices? Or a creative way to use a shoe rack for something other than shoes? I’d love to hear it.  Sharing ideas is so fun!

Happy organizing! Have a great weekend!

Wrapping Up Loose Ends

Say what?? I don’t mean to throw you for a loop with the title of this post but just yesterday I hauled out some Christmas wrapping paper (hey, there’s still plenty of time…) and wrapped a couple gifts.  This morning I wrapped a few more.  You know what the most annoying thing about wrapping paper is? Well, for me, it’s all those scraps you cut off that are big enough to be used for something else but they’re not attached to the big roll anymore.  How do you save those and not have a giant frustrating mess when you store them and go to retrieve them for another gift?

I know you can probably buy a plastic tub or something but I’m cheap frugal and don’t want to spend money on solving this problem.

Enter…toilet paper rolls and paper towel rolls!


Wrapping Up Loose Ends


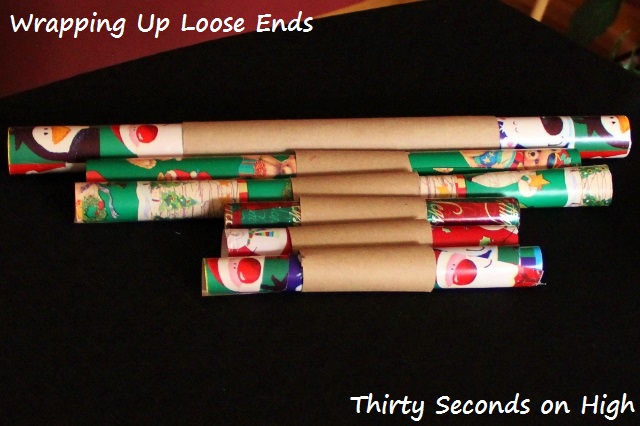
See, look how nice and neat that is? It’s a dream come true and since I’m pretty sure my dream of a white Christmas is going to remain a dream this year, this will have to do.  For some of these, I will have to be careful to keep them horizontal so the paper doesn’t fall out but it’s a huge improvement from the chaos that was loose scraps of paper.  I suppose I could move the roll to the end and paperclip the paper to the roll…we’ll see…well, no, I like having the roll in the middle – gives more support to the paper, especially the longer ones.

Anyway, I also just happened to have an empty wrapping paper roll so cut that into several shorter pieces.  Hooray for reusing things! And for the paper that’s still on the roll, a rubber band on each end helps keep it from unrolling on you when you don’t want it to.


So, that’s a wrap.  Haha.  Sorry – couldn’t resist.  I hope this tip helps you out.  Do you have a creative solution to storing wrapping paper scraps? If so, please share!

I’m going to be pretty busy the next several days so if I don’t post again before Wednesday, have yourself a very Merry Christmas!